
1. Quick Answer
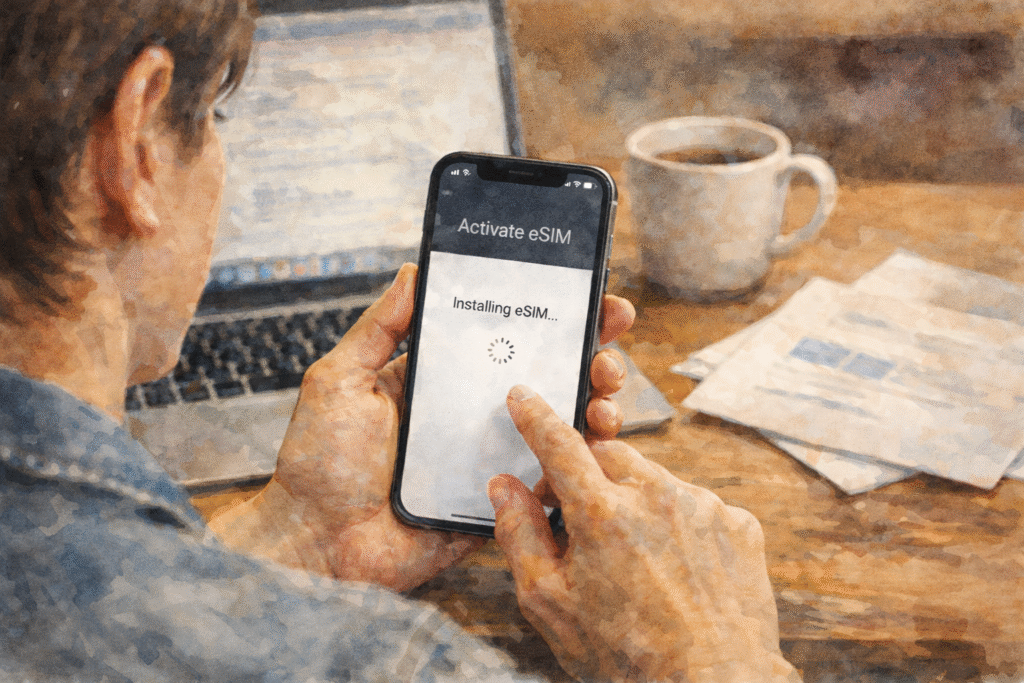
Most iPhone eSIM activation errors like “Unable to Add eSIM” or “Activation Failed” are caused by network glitches, outdated iOS software, or carrier provisioning delays. Restarting the device, refreshing network settings, or reinstalling the eSIM usually resolves the issue within minutes.
2. What the Error Messages Mean
Seeing an error message helps narrow down where the activation stopped. Each one points to a different stage of the setup process:
Unable to Add eSIM
The iPhone cannot install the digital SIM profile. This often happens if the QR code expired, the device can’t reach activation servers, or carrier settings haven’t updated yet.
Activation Failed
The eSIM was detected but the network rejected the activation request. This usually means the line hasn’t been provisioned correctly on the carrier side.
Stuck Activating
The phone is waiting for confirmation from the network. Most of the time it’s a connection or server communication delay rather than a hardware problem.
Plan Added but No Signal
The eSIM installed successfully but the network didn’t attach to the tower. This commonly points to network configuration or account setup issues.
The important part: these messages are normal during eSIM setup and almost always fixable using the steps in this guide.
3. Common Causes of eSIM Activation Failure
Activation usually fails because something interrupts communication between the phone and the network during setup. The cause normally falls into one of the categories below.
Network & Carrier Issues
- Network congestion — busy towers can delay activation requests
- Carrier servers temporarily unavailable — the network cannot complete provisioning
- eSIM already active on another device — the number is still linked to a previous phone
Device & Software Issues
- Outdated iOS version — older software may not communicate correctly with activation servers
- Incorrect carrier settings — the phone hasn’t downloaded the latest network configuration
- Compatibility limitations — certain models or regions may not fully support the eSIM profile
Setup Problems
- Expired QR code — many codes work only once or within a limited time
- Weak or unstable Wi-Fi connection — activation requires reliable internet access
- Physical SIM interference — another SIM can sometimes conflict during setup
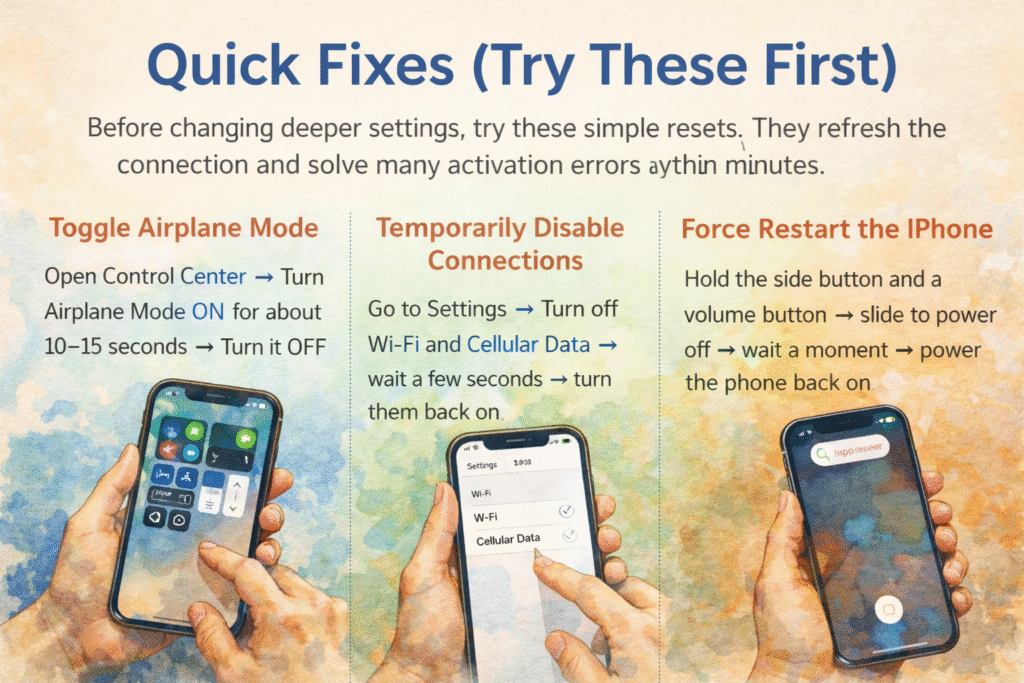
4. Quick Fixes (Try These First)
Before changing deeper settings, try these simple resets. They refresh the connection and solve many activation errors within minutes
- Toggle Airplane Mode
Open Control Center → Turn Airplane Mode ON for about 10–15 seconds → Turn it OFF. - Temporarily Disable Connections
Go to Settings → Turn off Wi-Fi and Cellular Data → wait a few seconds → turn them back on. - Force Restart the iPhone
Hold the side button and a volume button → slide to power off → wait a moment → power the phone back on.
These steps reset the network handshake between the device and carrier before moving to more advanced troubleshooting.
ALT
5. Check Your Device Setup
If the quick fixes didn’t help, make sure the phone is correctly prepared for activation. A small setup detail can stop the process completely.
Connect to Wi-Fi
eSIM activation needs a stable internet connection. Join a reliable Wi-Fi network before trying again.
Update iOS
Go to Settings → General → Software Update and install the latest version. Activation problems often happen on older software.
Confirm Carrier Supports eSIM
Make sure your network has enabled the line for eSIM use. If the plan was recently converted from a physical SIM, the carrier may still be provisioning it.
Toggle the Plan Off and On
Go to Settings → Cellular (Mobile Data)
Select the eSIM plan → turn it OFF → wait a few seconds → turn it ON again.
This forces the phone to reconnect to the network profile.
Update Carrier Settings
Go to Settings → General → About
If a carrier update is available, a prompt will appear. Accept it — this installs the correct network configuration required for activation.
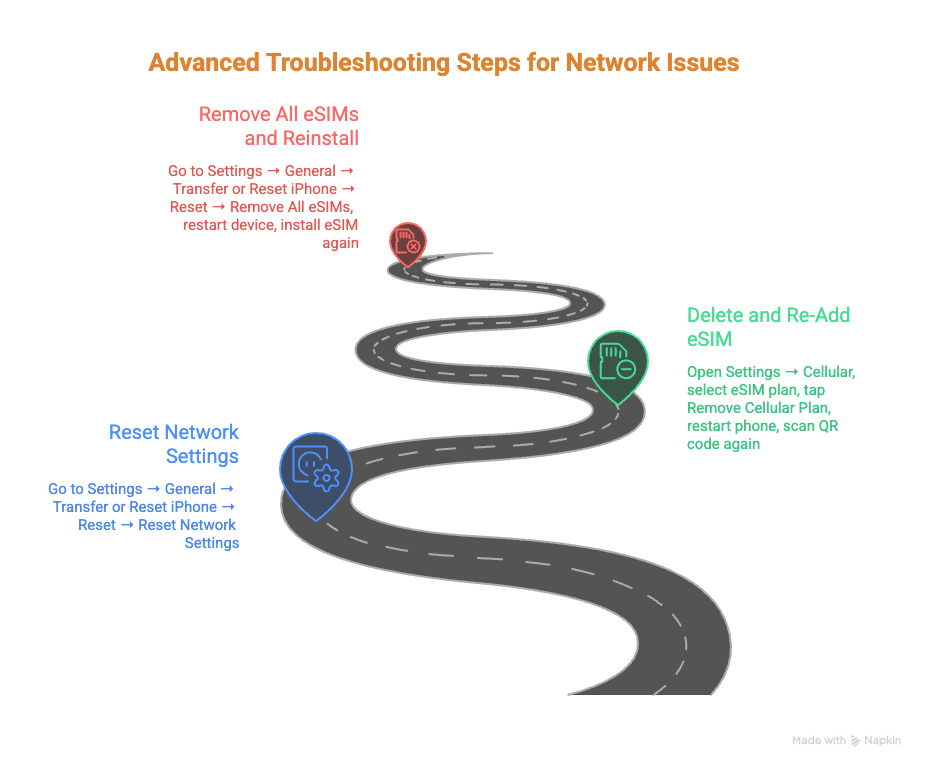
6. Advanced Troubleshooting
If setup checks don’t resolve the issue, move to deeper resets that rebuild the network configuration.
Reset Network Settings
Go to:
Settings → General → Transfer or Reset iPhone → Reset → Reset Network Settings
This removes:
- saved Wi-Fi networks and passwords
- APN and cellular settings
- Bluetooth and VPN network configurations
Your personal data stays intact.
Delete and Re-Add the eSIM
Sometimes the profile installs incorrectly.
- Open Settings → Cellular
- Select the eSIM plan
- Tap Remove Cellular Plan
- Restart the phone
- Scan the QR code again or enter details manually
Remove All eSIMs and Reinstall (Last Resort)
If activation keeps failing:
- Go to Settings → General → Transfer or Reset iPhone
- Choose Reset → Remove All eSIMs
- Restart the device
- Install the eSIM again using a new QR code if available
This rebuilds the cellular configuration from scratch and is usually done before contacting support.
7. When You Must Contact Support
If the eSIM still won’t activate after resets and reinstall attempts, the issue is usually on the carrier side and cannot be fixed from the phone. This commonly happens when the line was not provisioned correctly or the profile is blocked on the network.
Contact support if:
- The QR code scans but there is still no signal after a long wait
- The phone keeps showing Activation Failed
- The line works on the carrier’s system but not on the device
- The eSIM was transferred from another phone and stopped working
Before calling or visiting a store, have these ready:
- The exact error message shown on the iPhone
- Your phone number
- Account PIN or ID verification details
- IMEI or EID number (Settings → General → About)
- iOS version installed
You can also use the Apple Support app (available on newer iOS versions) to run diagnostics.
For South Africa, contact your network directly:
- MTN support
- Vodacom support
They may need to reprovision or reissue a new eSIM profile.
8. Frequently Asked Questions
Why does my eSIM say activated but no service?
The profile installed successfully, but the network hasn’t attached your number to a tower yet. This usually requires a carrier refresh.
Can I reuse a QR code?
Usually no. Most QR codes work only once and expire after activation.
Does resetting network settings delete my number?
No. It only removes saved connections and configuration settings from the phone.
How long should activation take?
Normally a few minutes. Some networks may take longer while the line is being provisioned.
9. Helpful Resources
- Apple Support: https://support.apple.com/en-za/102478
- Apple Support (US): https://support.apple.com/en-us/102478
- Balieasy Guide: https://esim.balieasy.com/blog/esim-stuck-activating-iphone/
- eSIMX Guide: https://esimx.com/blog/esim-guides/how-to-fix-esim-cannot-be-added/
- Keepgo Troubleshooting: https://www.keepgo.com/blogs/articles/iphone-esim-issues-troubleshooting-guide
10. Final Summary
Most iPhone eSIM activation problems are related to network setup rather than hardware failure. Work through the steps in order, starting with simple connection resets and ending with reinstalling the eSIM. If the issue continues after all troubleshooting, contact your carrier so they can correct the activation on their side.
Frequently Asked Questions (FAQs)
Frequently Asked Questions (FAQs)
1. Why does my iPhone say “Unable to Add eSIM”?
This error usually appears when the QR code has expired, the device cannot connect to activation servers, or the carrier has not fully provisioned the line. Refreshing your network connection or requesting a new QR code often resolves it.
2. Why is my eSIM stuck on “Activating”?
When an eSIM is stuck activating, the iPhone is waiting for confirmation from the carrier. This is typically caused by network delays, weak Wi-Fi, or temporary server issues on the carrier’s side.
3. Can I transfer my eSIM to another iPhone?
Yes, most carriers allow eSIM transfer. However, the previous device must release the profile first. If transfer fails, your carrier may need to reissue a new eSIM activation code.
4. Does removing an eSIM delete my phone number?
No. Removing the eSIM from your device does not cancel your mobile number. It only removes the digital SIM profile from the phone. The carrier still controls the number.
5. Why do I have signal bars but no data connection?
If you see signal but cannot use mobile data, the eSIM may not be fully provisioned for data services. Updating carrier settings or contacting your provider can resolve this.
6. Is eSIM more reliable than a physical SIM?
eSIM technology is generally just as reliable as a physical SIM. Most activation problems are related to network provisioning rather than the eSIM itself.